Installing a trunk bike rack safely on your car involves meticulous preparation, precise execution of each step, and consistent post-installation checks to prevent damage to bikes, your vehicle, or hazardous road situations. This guide details how to securely mount a trunk bike rack, ensuring peace of mind for every journey.
Understanding Trunk Bike Racks
Trunk bike racks are a popular choice for cyclists due to their versatility and affordability. They are designed to attach to the rear of your sedan, hatchback, or SUV, using a system of adjustable straps and hooks that secure over the edges of the trunk lid or rear hatch.
What is a Trunk Bike Rack?
A trunk bike rack typically consists of a frame with padded feet that rest against your vehicle’s surface, and arms that extend outwards to hold your bicycles. Multiple straps with hooks secure the rack to the top, sides, and bottom edges of your trunk or hatchback. The design is simple, often foldable for easy storage when not in use, and does not require any permanent vehicle modifications like a hitch receiver.
Why Choose a Trunk Bike Rack?
Trunk racks offer several advantages:
- Affordability: They are generally the most budget-friendly option compared to hitch or roof racks.
- Ease of Storage: Many models fold down compactly for convenient storage in your garage or trunk.
- No Hitch Required: They are ideal for vehicles without a trailer hitch, offering a straightforward way to transport bikes.
- Simple Installation (once learned): While initial setup requires attention to detail, the process becomes quicker with practice.
However, there are also considerations:
- Potential for Paint Damage: Direct contact between the rack, bikes, and your car’s paint can lead to scratches or dents if not installed with care.
- Limited Capacity: Most trunk racks are designed for one to three bikes, and can have lower weight limits compared to other rack types.
- Restricted Trunk Access: You typically cannot open your trunk or rear hatch when the rack is installed, especially with bikes loaded, without risking damage to the rack, vehicle, or bikes.
- Rear Visibility: The rack and bikes can obstruct your rear view, requiring increased vigilance while driving.
Pre-Installation Checklist: Ensuring Safety First
Before you even think about attaching your trunk bike rack, a few crucial checks will set the foundation for a safe and secure installation. Skipping these steps is a common oversight that can lead to problems down the road.
Compatibility Check
Not all trunk racks fit all vehicles. Always consult the rack manufacturer’s fit guide to ensure your specific car make, model, and year are compatible. Pay close attention to any restrictions, especially for vehicles with spoilers or specific trunk designs.
Beyond physical fit, confirm the weight limits for both your rack and your vehicle. The total weight of your bikes must not exceed the rack’s maximum capacity, nor should the combined weight of the rack and bikes surpass what your car’s trunk can safely support. Overloading is a recipe for disaster.
Inspecting Your Rack and Vehicle
|
Our Picks for the Best Bike Rack in 2026
As an Amazon Associate I earn from qualifying purchases.
|
||
| Num | Product | Action |
|---|---|---|
| 1 | Allen Sports Deluxe 4-Bike Hitch Mount Rack (2-Inch Receiver) , Black |

|
| 2 | Vertical Bike Parking Stand - Adjustable Height for 29"Wheels, Space-Saving & Freestanding Bike Rack for MTB/Road Bikes,No-Drill Installation Indoor Bike Storage for Apartments & Garages |
|
| 3 | 2 Bikes Floor Stand,Adjustable Bicycle Parking Rack with Hook for Garage/Indoor/Outdoor,Metal Cycle Storage Organizer Rack for Road Bikes |
|
| 4 | Vertical Bike Stand, Upright Bike Parking Rack Floor, Adjustable Bicycle Storage for Wheels Sizes up to 29", Freestanding Bicycle Organizer with Swivel Casters, Indoor Bike Holder for Garage 2-Pack |
|
| 5 | Young Bike Rack Hitch for Car - 200LB 2-Bike Rack Hitch Mount Platform Style Hitch Bike Rack,Smart Tilting & Easy Fold for Car SUV with 2 Inch Receiver,Bike Carrier Fits Up to 5-inch Fat Tire |
|
| 6 | Vertical Bike Stand, Freestanding Bike Rack Garage Storage Upright Bicycle Floor Stand Indoor Bike Holder with Adjustable Height for Garage & Apartment - for Wheels Sizes up to 29” |
|
| 7 | CyclingDeal Upright Bike Stand Floor - Vertical & Horizontal Bicycle Stand Bicycle Storage - Safe & Secure Bike Storage Rack - for Wheels Sizes up to 29" - Bike Rack Garage Bicycle Rack - Classic |
|
| 8 | monTEK Swivel Bike Wall Mount, Bike Hangers for Garage, Space-Saving Vertical Bike Rack, Sturdy Bike Storage Rack Holds Up to 66lbs, Easy to Install, 4 Pack |
|
| 9 | CHEPARK Bike Floor Stand Rack- Indoor Bike Stand for Garage/Home - Bike Storage Bicycle Parking Rack Fit 20”-29” Mountain Road Bikes (1 Bike Rack) |
|
| 10 | KUAT Sherpa 2.0 Durable Lightweight Aluminum Compact 2 Bike Transporting Hitch Rack with Cable Lock & Foldable Tire Cradles | Capacity - 40 Lbs per Tray |
|
Take a moment to examine your bike rack. Look for any signs of wear, damage, or loose parts on the straps, hooks, buckles, and padding. Ensure all rubber or foam pads are intact and securely attached, as these are critical for protecting your car’s finish.
Similarly, inspect the areas on your car where the rack will make contact – the top, sides, and bottom edges of your trunk, and the surface where the padded feet will rest. These areas should be clean and free of dirt, dust, or debris, which can act like sandpaper and cause scratches during transit.
Gathering Your Tools
While most trunk racks don’t require specialized tools for installation, having a few items handy will make the process smoother and safer:
- Cleaning Supplies: A microfiber cloth and mild cleaner for your car’s contact points.
- Measuring Tape: To help center the rack if needed.
- Your Rack’s Instruction Manual: This is paramount. Each rack has unique specifications and safety warnings. Read it thoroughly.
- Protective Barriers (Optional but Recommended): Consider using specialized paint protection films, flannel pads, or even soft towels to add an extra layer between the rack’s contact points and your car’s paint.
 A person cleaning the car's trunk surface before installing a bike rack, showing cleaning spray and a microfiber cloth
Step-by-Step Guide to Safely Installing Your Trunk Bike Rack
Installing a trunk bike rack isn’t complicated, but it demands precision and careful attention to detail at each stage. Follow these steps to ensure your rack is securely mounted.
Step 1: Preparing Your Car and Rack
Start by parking your vehicle on a flat, level surface. Thoroughly clean all areas of your car where the rack’s pads and hooks will make contact. Even tiny grit can cause significant scratches when vibrated against your paintwork.
Next, unfold your bike rack according to its manual. Most racks have arms that snap into place. Ensure all setup pins are fully engaged and the rack feels stable before attempting to place it on your car. Check that all straps are correctly threaded through their buckles; improper threading is a common cause of straps loosening.
Step 2: Positioning the Rack on Your Trunk
Carefully place the rack against your trunk or hatchback. The goal is to center it horizontally across the trunk lid. The padded feet should rest flat and evenly against the vehicle’s surface, avoiding any flimsy plastic trim or license plates. For vehicles with a rear spoiler, some racks are specifically designed to clear them, while others may require an “over-the-top” design. Always refer to your rack’s specific instructions for spoiler compatibility. Ensure the rack arms are inclined slightly upwards, providing enough clearance for your bikes from the road and exhaust.
Step 3: Securing the Straps and Hooks
This is the most critical phase for stability. Trunk racks typically have six straps: two top, two side, and two bottom.
- Top Hooks: Hook the upper straps over the top edge of your trunk lid. Ensure these hooks are fully engaged and seated securely on the metal edge, not just on thin weather stripping or plastic. Pull the straps to remove initial slack, but don’t fully tighten yet.
- Bottom Hooks: Attach the lower hooks to a sturdy metal edge underneath your bumper or at the very bottom of your trunk. If there isn’t a suitable metal edge, some racks allow for securing hooks just inside the trunk opening, closing the trunk carefully on the straps. Avoid attaching to plastic bumper covers, which can bend or break. Again, take up initial slack.
- Side Hooks: Secure the side straps to the left and right edges of your trunk or rear hatch. These should also hook onto a strong metal point.
Once all hooks are in place, begin tightening the straps. Start with the top straps, then the bottom, and finally the side straps, working evenly. The rack should feel incredibly snug and almost immovable. Tug each strap and connection to confirm tightness. Insufficient strap tension is the number one issue leading to rack instability and potential damage. The rack should not wobble or shift with moderate force.
Step 4: Adjusting the Cradle Arms and Bike Holders
With the rack firmly attached, adjust the cradle arms (where the bikes rest) to be as level as possible. Ensure the bike cradles or holders are spaced appropriately for your bicycles, preventing them from touching each other or the vehicle. Many racks feature anti-sway cradles that help stabilize bikes.
Step 5: Performing a Final Safety Check
Before loading any bikes or driving, perform a thorough safety check:
- Wiggle Test: Grasp the rack firmly and try to wiggle it. It should have minimal to no movement. If it shifts significantly, re-tighten all straps evenly.
- Strap Inspection: Double-check that all straps are tight and haven’t slipped. Ensure no strap is twisted or caught in a way that could compromise its integrity.
- Clearance: Verify that no part of the rack or potential bike positions will contact hot exhaust pipes, taillights, or block your license plate.
- Trunk Access: that with a trunk rack installed, especially with bikes, accessing your trunk is usually not possible without removing the rack. Attempting to open the trunk can damage the hinges or cause the rack to detach.
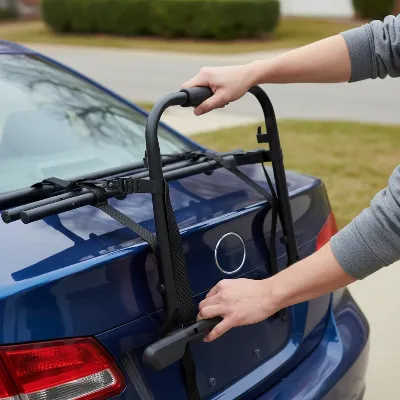 A person performing a final stability check on a securely installed trunk bike rack on a car, with an empty rack
Loading Your Bikes Safely
Properly loading your bikes is just as crucial as installing the rack. Incorrect bike placement and securing can lead to damage to your bikes, the rack, or your car.
Preparing Your Bikes
Before loading, remove any loose accessories from your bicycles, such as water bottles, bags, lights, or pumps. These items can fall off, get damaged, or even damage your car or other bikes during transit. It’s also a good idea to ensure your tires are properly inflated and the chain is secure.
Proper Bike Placement
When loading multiple bikes, always place the heaviest bike closest to the car. This helps maintain the rack’s center of gravity and reduces strain. If you’re carrying two or more bikes, alternate their directions (e.g., front wheel facing left for the first bike, front wheel facing right for the second). This often helps prevent handlebars and pedals from interfering with each other. If possible, consider using a frame adapter bar for bikes with non-traditional frames (like women’s or full-suspension bikes) to ensure they sit level and securely on the rack arms.
Securing Bikes to the Rack
Every bike rack comes with specific tie-down straps or cradles to secure your bikes. Use all provided straps for both the bike frame and wheels. Ensure the frame is snug in the cradles and the anti-sway straps are tightened to minimize movement. Then, secure the wheels to prevent them from spinning or bumping against the car. Velcro straps or bungee cords can be helpful for this. Double-check that pedals or handlebars won’t rub against your car’s paint or windows. Consider using foam or fabric barriers between bikes if there’s any risk of contact.
Maintenance and Best Practices for Trunk Bike Racks
A trunk bike rack is an investment, and proper care ensures its longevity and continued safety.
Regular Inspection
Make it a habit to inspect your rack before and after every trip. Check all straps for tightness, look for any fraying or damage, and ensure hooks are still firmly seated. Examine the padded feet for wear and tear. Address any issues immediately.
Cleaning and Storage
Periodically clean your bike rack, especially if it gets muddy or dusty. Store your rack indoors or in a sheltered area when not in use to protect it from the elements, which can degrade materials over time. This also reduces the risk of accidental bumps and scratches to your car if the rack is left on unnecessarily.
Driving with a Trunk Bike Rack
Driving with a bike rack, especially one loaded with bikes, changes your vehicle’s dynamics. Be mindful of:
- Increased Length: Your vehicle will be longer. Allow extra room when parking, changing lanes, and navigating tight spaces.
- Turns and Bumps: Take turns slower and be more cautious over bumps. Sudden movements can put undue stress on the rack and its attachments.
- Rear Visibility: Always be aware of reduced rear visibility and use your side mirrors more frequently.
“Always the most secure trunk bike rack installation is achieved through a combination of meticulous preparation, precise execution of each step, and consistent post-installation checks.”
Conclusion
Safely installing a trunk bike rack on your car is a straightforward process that requires attention to detail and a commitment to following best practices. By thoroughly checking compatibility, preparing both your vehicle and the rack, meticulously following the installation steps, and securely loading your bikes, you can significantly reduce the risks of damage or accidents. Regular maintenance and mindful driving habits further contribute to a secure and enjoyable experience. With these tips, you’re not just attaching a rack; you’re ensuring your valuable bikes—and your car—are protected on every adventure. So, what new cycling destinations will you explore with your securely transported bike?
Frequently Asked Questions
Can all cars use a trunk bike rack?
No, not all cars are compatible with trunk bike racks. Compatibility depends on factors like vehicle make, model, year, and whether it has a rear spoiler. Always consult the rack manufacturer’s fit guide to confirm if a specific model is suitable for your vehicle.
How do I prevent my car’s paint from scratching?
To prevent paint scratches, always clean all contact points on your car before installation. Ensure the rack’s padded feet are intact and consider using protective films or flannel pads between the rack and your car. Also, ensure straps are sufficiently tight to prevent rack movement, and secure bikes to prevent them from swaying or rubbing against the vehicle.
What is the maximum number of bikes I can carry?
The maximum number of bikes you can carry depends on the specific trunk rack’s design and its weight capacity. Most trunk racks are designed to carry one to three bikes. It’s crucial to never exceed the rack’s stated weight limit or the combined weight limit for your vehicle’s trunk.
How often should I check the straps during a trip?
It’s highly recommended to check all straps and connections for tightness every time you stop, such as for gas or a rest break, especially during longer trips. Vibrations and aerodynamic forces during driving can cause straps to loosen over time, making regular checks essential for safety.
Frequently Asked Questions
Can all cars use a trunk bike rack?
No, not all cars are compatible with trunk bike racks. Compatibility depends on factors like vehicle make, model, year, and the presence of a rear spoiler. Always consult the rack manufacturer's fit guide to confirm suitability for your specific vehicle.
How do I prevent my car's paint from scratching?
To prevent paint scratches, clean all contact points on your car before installation. Ensure the rack's padded feet are intact and consider using protective films or flannel pads between the rack and your car. Additionally, tighten straps sufficiently to prevent rack movement, and secure bikes to prevent swaying or rubbing against the vehicle.
What is the maximum number of bikes I can carry on a trunk rack?
The maximum number of bikes you can carry depends on the specific trunk rack's design and its weight capacity. Most trunk racks are designed to carry one to three bikes. It is crucial to never exceed the rack's stated weight limit or your vehicle's combined weight limit for the trunk.
How often should I check trunk bike rack straps during a trip?
It is highly recommended to check all straps and connections for tightness every time you stop, such as for gas or a rest break, especially during longer trips. Vibrations and aerodynamic forces during driving can cause straps to loosen over time, making regular checks essential for safety.
What are the main advantages of choosing a trunk bike rack?
Trunk bike racks offer several advantages, including affordability compared to hitch or roof racks, ease of compact storage, and no requirement for a trailer hitch. While initial setup requires attention, the installation process becomes quicker with practice.
How to Safely Install a Trunk Bike Rack on Your Car
Follow these steps to securely and safely install a trunk bike rack on your car, ensuring your bikes are protected during transport.
Park your vehicle on a flat, level surface and thoroughly clean all areas where the rack's pads and hooks will make contact to prevent scratches. Unfold your bike rack according to its manual, ensuring all setup pins are engaged and straps are correctly threaded through their buckles.
Carefully place the rack against your trunk or hatchback, centering it horizontally. Ensure the padded feet rest flat and evenly against the vehicle's surface, avoiding flimsy plastic trim or license plates. Verify that the rack arms are inclined slightly upwards for bike clearance.
Attach the two top, two bottom, and two side straps to sturdy metal edges of your trunk or bumper, ensuring hooks are fully engaged. Begin tightening the straps evenly, starting with the top, then bottom, and finally side straps. The rack should feel incredibly snug and almost immovable, with no significant wobble.
With the rack firmly attached, adjust the cradle arms to be as level as possible. Ensure bike cradles are spaced appropriately to prevent bikes from touching each other or the vehicle. Utilize anti-sway cradles if available to stabilize bikes.
Before loading bikes or driving, perform a thorough wiggle test on the rack; it should have minimal movement. Double-check all straps for tightness and ensure no part of the rack or potential bike positions will contact hot exhaust pipes, taillights, or block your license plate.

This really helped me understand the importance of those post-installation checks. I used to just throw my bikes on and go, but now I double-check everything before hitting the road. It’s given me a lot more confidence when transporting my road bike.
The guide was helpful for the most part, especially the tips on positioning the padded feet. However, I found that getting the right tension on all the straps took a bit more trial and error than I expected. My particular hatchback made the side strap placement a little tricky, but I got it eventually.
I’ve used trunk racks for years, but I learned a few new tricks from this. The detail about how the arms extend outwards to hold the bikes was a good reminder to ensure proper spacing. It’s definitely improved how securely my mountain bike sits on the rack.
I always thought installing a trunk bike rack was super complicated, but this guide made it so clear. The step-by-step instructions for securing the straps and hooks were a lifesaver. My bikes feel really secure now, even on longer drives, and I don’t worry about them shifting around.