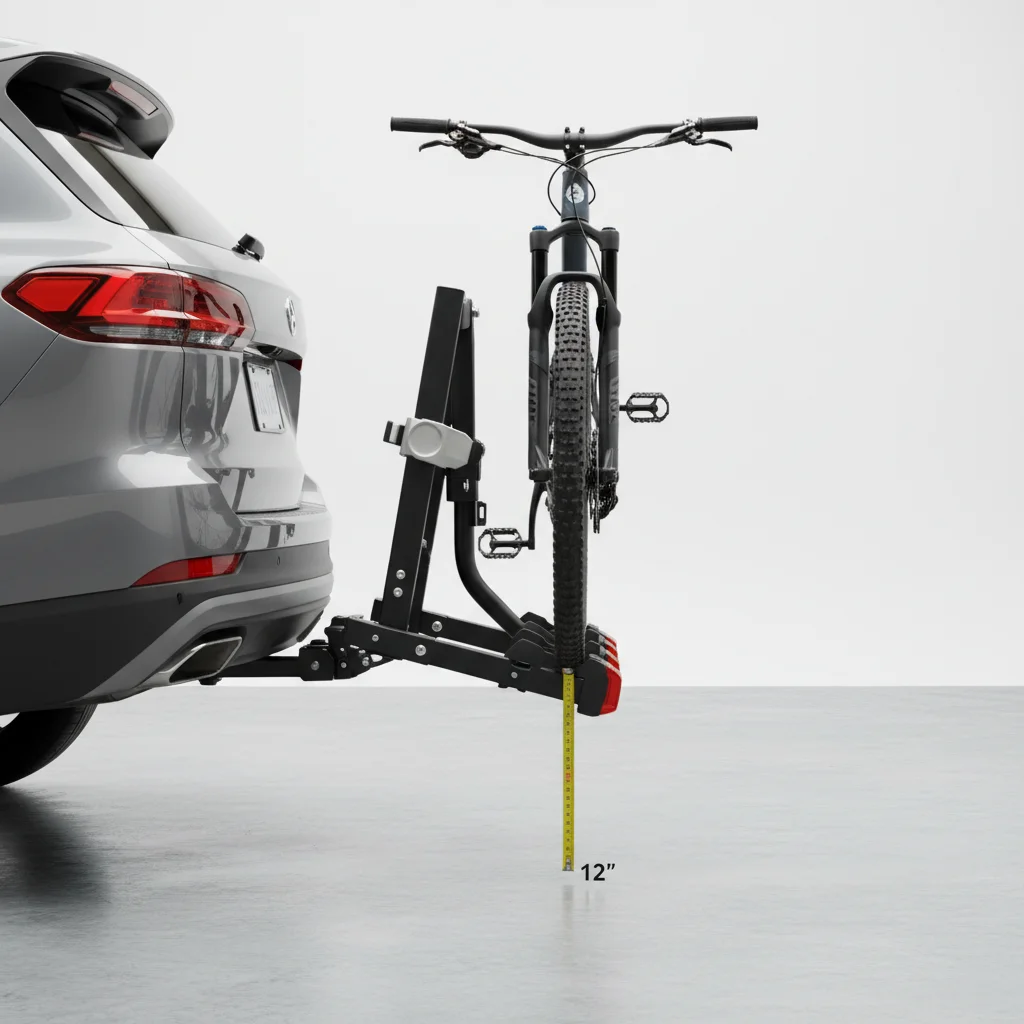
Understanding hitch bike rack clearance is crucial for safe and damage-free transport of your bicycles. Generally, you need a minimum of 10-12 inches of ground clearance for most standard hitch racks to avoid scraping on driveways, speed bumps, and uneven terrain. This measurement can vary significantly based on your vehicle’s suspension, the specific hitch receiver height, and the design of the bike rack itself. Insufficient clearance can lead to costly damage to both your rack and your bikes, especially when navigating challenging road conditions or off-road paths.
Factors Affecting Hitch Bike Rack Clearance
Several key factors influence the effective ground clearance of your hitch bike rack. The first is your vehicle’s rear overhang and the height of its hitch receiver. SUVs and trucks typically offer better clearance than sedans. The design of the bike rack also plays a significant role; some racks feature a rise in their shank to provide additional clearance, while others are designed with a straight shank. The length of the rack, especially when loaded with bikes, can also reduce the effective departure angle of your vehicle, making it more prone to scraping.
Another critical consideration is the weight of your bikes and any additional gear. A fully loaded rack can cause your vehicle’s suspension to sag, thereby reducing the overall ground clearance. It’s important to account for this sag when determining the minimum clearance needed. Always check your vehicle’s owner’s manual for recommended tongue weight limits and ensure your hitch and rack are rated to handle the combined weight of your bikes.
Measuring Your Current Clearance
To accurately determine your current hitch bike rack clearance, park your vehicle on a level surface and measure the distance from the lowest point of your hitch receiver to the ground. Then, if you already own a rack, attach it and measure from its lowest point to the ground, both unloaded and loaded with your bikes. This will give you a realistic understanding of your setup’s clearance. Pay particular attention to any parts of the rack that extend furthest back, as these are often the first to make contact with the ground.
Consider simulating common scenarios you’ll encounter, such as driving up a steep driveway or over a speed bump. You can use a piece of wood or a curb to mimic these obstacles and visually assess if your rack will clear them. This proactive approach can save you from potential damage and stress during your travels.
Tips for Maximizing Clearance
|
Our Picks for the Best Bike Rack in 2026
As an Amazon Associate I earn from qualifying purchases.
|
||
| Num | Product | Action |
|---|---|---|
| 1 | KUAT Sherpa 2.0 Durable Lightweight Aluminum Compact 2 Bike Transporting Hitch Rack with Cable Lock & Foldable Tire Cradles | Capacity - 40 Lbs per Tray |

|
| 2 | CyclingDeal Upright Bike Stand Floor - Vertical & Horizontal Bicycle Stand Bicycle Storage - Safe & Secure Bike Storage Rack - for Wheels Sizes up to 29" - Bike Rack Garage Bicycle Rack - Classic |
|
| 3 | Young Bike Rack Hitch for Car - 200LB 2-Bike Rack Hitch Mount Platform Style Hitch Bike Rack,Smart Tilting & Easy Fold for Car SUV with 2 Inch Receiver,Bike Carrier Fits Up to 5-inch Fat Tire |
|
| 4 | 2 Bikes Floor Stand,Adjustable Bicycle Parking Rack with Hook for Garage/Indoor/Outdoor,Metal Cycle Storage Organizer Rack for Road Bikes |
|
| 5 | monTEK Swivel Bike Wall Mount, Bike Hangers for Garage, Space-Saving Vertical Bike Rack, Sturdy Bike Storage Rack Holds Up to 66lbs, Easy to Install, 4 Pack |
|
| 6 | Vertical Bike Stand, Upright Bike Parking Rack Floor, Adjustable Bicycle Storage for Wheels Sizes up to 29", Freestanding Bicycle Organizer with Swivel Casters, Indoor Bike Holder for Garage 2-Pack |
|
| 7 | CHEPARK Bike Floor Stand Rack- Indoor Bike Stand for Garage/Home - Bike Storage Bicycle Parking Rack Fit 20”-29” Mountain Road Bikes (1 Bike Rack) |
|
| 8 | Vertical Bike Stand, Freestanding Bike Rack Garage Storage Upright Bicycle Floor Stand Indoor Bike Holder with Adjustable Height for Garage & Apartment - for Wheels Sizes up to 29” |
|
| 9 | Allen Sports Deluxe 4-Bike Hitch Mount Rack (2-Inch Receiver) , Black |
|
| 10 | Vertical Bike Parking Stand - Adjustable Height for 29"Wheels, Space-Saving & Freestanding Bike Rack for MTB/Road Bikes,No-Drill Installation Indoor Bike Storage for Apartments & Garages |
|
If you find your current setup lacks adequate clearance, there are several strategies you can employ. One common solution is to use a hitch extender with a rise, which can elevate the rack by several inches. However, be mindful that extenders can also reduce the overall weight capacity of your hitch. Another option is to choose a bike rack specifically designed with a raised shank or a more compact profile. Some platform racks offer better ground clearance than hanging racks due to their design.
For vehicles with adjustable air suspension, raising the rear of the vehicle can provide a temporary boost in clearance. Additionally, ensuring your tires are properly inflated can help maintain your vehicle’s intended ride height. When purchasing a new rack, always check the manufacturer’s specifications for ground clearance and consider reviews from users with similar vehicles.
- Utilize a hitch extender with a rise.
- Select a bike rack with a raised shank design.
- Ensure proper tire inflation to maintain ride height.
- Consider air suspension adjustments if available.
- Distribute bike weight evenly on the rack.
Consequences of Insufficient Clearance
Ignoring insufficient hitch bike rack clearance can lead to a range of problems. The most immediate concern is damage to the bike rack itself, which can bend, scrape, or even break if it repeatedly hits the ground. This damage can compromise the structural integrity of the rack, making it unsafe for transporting bikes. Furthermore, your bikes are also at risk of damage, particularly the lower parts of the frames, pedals, and wheels, which can be expensive to repair or replace.
Beyond the equipment, inadequate clearance can also affect your driving experience. Repeated scraping can be jarring and distracting, potentially leading to accidents. It can also cause damage to the road surface or obstacles you encounter. Prioritizing proper clearance ensures a smoother, safer, and more enjoyable journey for both you and your valuable bicycles.

I never really thought about how my vehicle’s suspension affects clearance until now. My truck has a lifted suspension, and I’ve always had plenty of room, but it’s good to know why. This helped me confirm I made the right choice with my current setup, even when fully loaded with bikes.
The info on vehicle’s rear overhang was interesting. I have an SUV, so I thought I’d be fine, but my specific rack design still sits a bit low. It’s mostly okay, but I still have to be really careful on some of the rougher off-road paths I take. It’s not terrible, but could be better.
I used to scrape my old rack all the time, especially on my sloped driveway. After reading about the 10-12 inches minimum ground clearance, I measured my setup and realized I was way under. Upgraded to a rack with a higher rise and it’s made a huge difference. No more cringe-worthy sounds!
This was super helpful for understanding why my previous rack always dragged. I drive an older sedan, and the hitch receiver height is just naturally lower. I ended up getting a rack specifically designed for better clearance, and it’s been great for getting over speed bumps without issues. Wish I’d known this sooner.